Difference between revisions of "Faq-how-to-setup-base-or-rover"
| (8 intermediate revisions by the same user not shown) | |||
| Line 1: | Line 1: | ||
__NOTOC__ | __NOTOC__ | ||
== Base station setup == | == 1. Base station setup == | ||
For base staion, it need output raw measurement data and fixed coordiantes. | |||
==== Use Satrack software ==== | Usually it can be raw data in RTCM format, which is the most common. | ||
The RTCM format includes MSMx types, where x ranges from 1 to 7, representing different contents. | |||
MSM4 or MSM7 are commonly used, with MSM4 being the most efficient and MSM7 containing the highest amount of data for better RTK performance. | |||
Our receiver supports both '''MSM4 and MSM7 formats for Rover'''. | |||
For Base stations, the output is in '''MSM7 format'''. | |||
=== 1.1 Setup RTCM messages output === | |||
==== 1.1.1 Use Satrack software ==== | |||
Connect the [[EVK-DG-1206 | NANO RTK Receiver]] to your Laptop via USB. | Connect the [[EVK-DG-1206 | NANO RTK Receiver]] to your Laptop via USB. | ||
| Line 53: | Line 64: | ||
[[File:satrack-view-rover-monitor-view.png|400px|frameless]] | [[File:satrack-view-rover-monitor-view.png|400px|frameless]] | ||
==== Send cmds to | |||
==== 1.1.2 Send cmds to config base station ==== | |||
*[https://wiki.datagnss.com/images/e/ea/Strsvr.zip Download setup utilities] | *[https://wiki.datagnss.com/images/e/ea/Strsvr.zip Download setup utilities] | ||
| Line 73: | Line 85: | ||
[[File:strsvr-main-02.png|400px|frameless]] | [[File:strsvr-main-02.png|400px|frameless]] | ||
=== Others setup (Ardupilot/Mission planner) === | Then start. | ||
[[File:strsvr-main-03.png|800px|frameless]] | |||
=== 1.2 Others setup (Ardupilot/Mission planner) === | |||
After above configuration, Please disconnect the receiver in the satrack. | After above configuration, Please disconnect the receiver in the satrack. | ||
| Line 86: | Line 103: | ||
then finish other configuration in Mission Planner. | then finish other configuration in Mission Planner. | ||
== 2. Rover station (Aircraft) setup == | |||
== Rover station (Aircraft) setup == | |||
For drones, NANO RTK Receiver or GEM1305 can be chosen as the Rover for RTK. | For drones, NANO RTK Receiver or GEM1305 can be chosen as the Rover for RTK. | ||
Latest revision as of 11:29, 6 November 2024
1. Base station setup
For base staion, it need output raw measurement data and fixed coordiantes.
Usually it can be raw data in RTCM format, which is the most common. The RTCM format includes MSMx types, where x ranges from 1 to 7, representing different contents.
MSM4 or MSM7 are commonly used, with MSM4 being the most efficient and MSM7 containing the highest amount of data for better RTK performance.
Our receiver supports both MSM4 and MSM7 formats for Rover. For Base stations, the output is in MSM7 format.
1.1 Setup RTCM messages output
1.1.1 Use Satrack software
Connect the NANO RTK Receiver to your Laptop via USB.
Setup the NANO RTK Receiver as a base station, and it is recommended to use Satrack software.
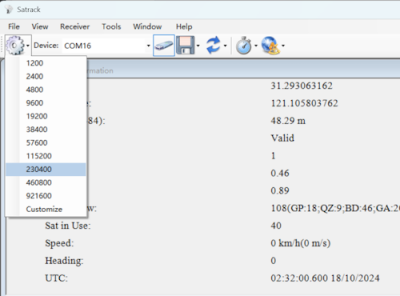
1. Open Satrack, then choose the com port, baud rate then connect the receiver.
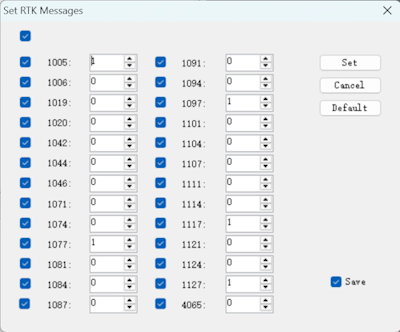
2. Menu "Tools" - "Set RTCM rate", Enable RTCMv3 output
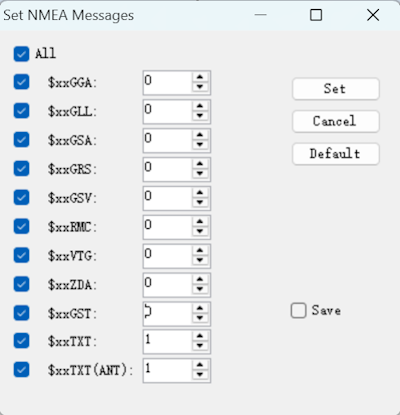
3. Menu "Tools" - "Set NMEA rate", Disable NMEA data output
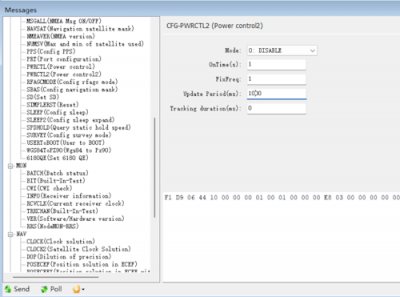
4. Menu "View" - "AS Messages view", Config output rate to 1Hz
In base station mode, the RTCM data output rate must be set to 1Hz.
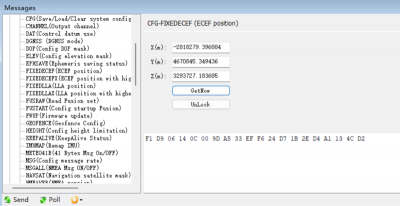
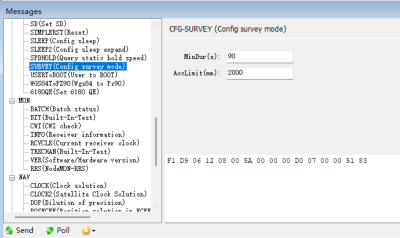
5. Config the base station fixed coordinates
There are two methods to set the coordinates of the base station:
5.1 According to the diagram below, Input the known coordinates.
Press "Get now", and modify the coordinates to the known values, then "send" to apply the fixed coordinates.
5.2 According to the CFG-SURVEY method, config miniDuration and AccLimit, then automatically calculate the average before proceeding with the setup.
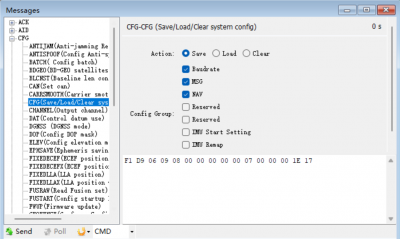
After completing the above operation, you can save the current configuration with CFG-SAVE.
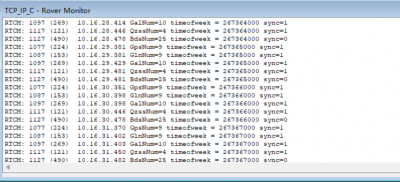
Then go to Menu "View" - "Rover Monitor view", you will see RTCM data monitor.
1.1.2 Send cmds to config base station
Unzip the Strsvr.zip
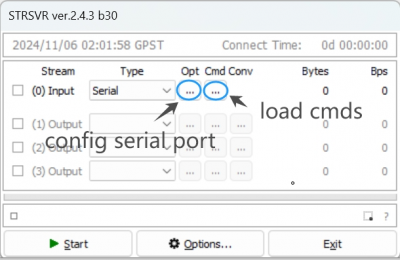
Open strsvr.exe, choose serial for Input stream
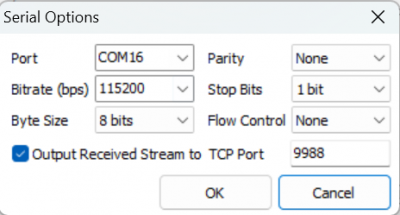
Config serial and baud rate, output TCP stream port number, here is 9988
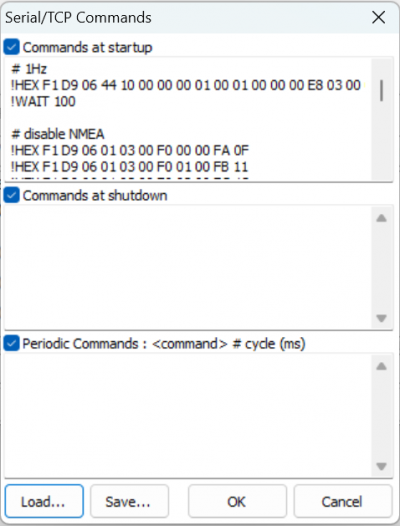
Load commands for configuration
Then start.
1.2 Others setup (Ardupilot/Mission planner)
After above configuration, Please disconnect the receiver in the satrack.
If it is used as a base station for drone applications, you can now open the ground control software, such as Mission Planner.
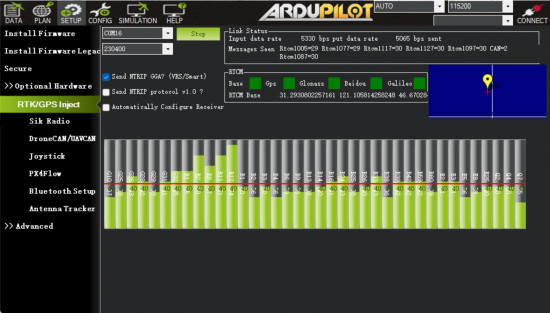
In the menu "Setup" - "Optional Hardware" - "RTK/GPS Inject", select the receiver's com port and baud rate.
then finish other configuration in Mission Planner.
2. Rover station (Aircraft) setup
For drones, NANO RTK Receiver or GEM1305 can be chosen as the Rover for RTK.
- Please note that NANO RTK Receiver supports Ardupilot starting from V3.0.
Whether you choose NANO RTK Receiver or GEM1305, you need to confirm in the Satrack software that all RTCM data outputs are disabled and all NMEA outputs are enabled.
In Rover mode, the output rate must be set to 5Hz.
Note: NANO RTK Receiver and GEM1305 do not support safety switch, so BRD_SAFETY_DEFLT needs to be set to 0 or a separate safety switch should be connected to the flight controller.
After completing the above settings, you can write parameters to the flight controller.
