Difference between revisions of "FAQ"
| (11 intermediate revisions by the same user not shown) | |||
| Line 12: | Line 12: | ||
'''A''': | '''A''': | ||
[[File:faq-get-mon-ver.png|500px|frameless|get mon-ver]] | |||
| Line 23: | Line 25: | ||
It should be noted that not all bands can be configured, as this is subject to the limitations of the module's RF performance. | It should be noted that not all bands can be configured, as this is subject to the limitations of the module's RF performance. | ||
The following table will illustrate the configuration combinations. | The following table will illustrate the configuration combinations. | ||
{| class="wikitable" style="text-align:center;" | |||
|- style="text-align:left;" | |||
! rowspan="2" style="text-align:center;" | Mode | |||
! colspan="5" style="text-align:center;" | GPS/QZS | |||
! colspan="6" style="text-align:center;" | BDS | |||
! colspan="2" | GLONASS | |||
! colspan="4" | GALILEO | |||
! NavIC | |||
! SBAS | |||
|- | |||
| L1CA | |||
| L1C | |||
| L2C | |||
| L5 | |||
| L6 | |||
| B1I | |||
| B1C | |||
| B2I | |||
| B2b | |||
| B2a | |||
| B3I | |||
| G1 | |||
| G2 | |||
| E1 | |||
| E5a | |||
| E5b | |||
| E6 | |||
| L5 | |||
| L1 | |||
|- | |||
| style="text-align:left;" | A | |||
| • | |||
| (1) | |||
| - | |||
| • | |||
| - | |||
| • | |||
| • | |||
| - | |||
| - | |||
| • | |||
| - | |||
| • | |||
| - | |||
| • | |||
| • | |||
| - | |||
| - | |||
| (1) | |||
| • | |||
|- | |||
| style="text-align:left;" | B | |||
| • | |||
| (1) | |||
| • | |||
| - | |||
| - | |||
| • | |||
| • | |||
| • | |||
| - | |||
| - | |||
| - | |||
| • | |||
| • | |||
| • | |||
| - | |||
| • | |||
| - | |||
| - | |||
| • | |||
|} | |||
[1] Supported upon request with special firmware | |||
Switching from Option A to Option B requires re-flashing a different firmware version. | Switching from Option A to Option B requires re-flashing a different firmware version. | ||
1. Open the Satrack software, after connecting the device, under the AS Message window, in the CFG-NAVSAT section, | |||
2. first poll the current configuration, then you can turn off certain bands, such as turning off G1, and then send. | |||
3. If you need to maintain the status for the next time, you should save it with CFG-SAVE. | |||
[[File:faq-config-constellation.png|800px|frameless]] | [[File:faq-config-constellation.png|800px|frameless]] | ||
'''Q''': How to save data for debug? | |||
'''A''': | |||
Latest revision as of 22:05, 9 May 2024
Q: How to get satrack evaluation software?
A: Please download Satrack here.
Q: How to set the output sample rate for the module?
A: Please refer to this article FAQ-how-to-config-output-rate.
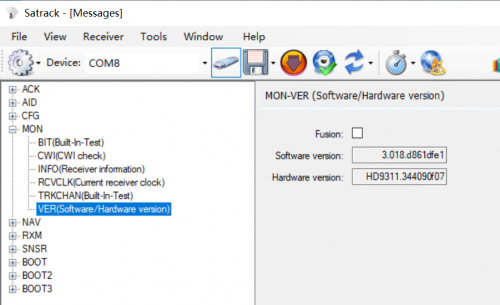
Q: How to get the software and hardware version of the module?
A:
Q: How to config the constellations for the module?
A: Not all specifications of modules support constellation configuration, for example, most PVT modules do not support constellation configuration.
The default firmware supports certain combinations, which are determined when the firmware is generated.
For high level modules such as TAU1308/TAU1312/TAU1302, constellation configuration is supported.
It should be noted that not all bands can be configured, as this is subject to the limitations of the module's RF performance.
The following table will illustrate the configuration combinations.
| Mode | GPS/QZS | BDS | GLONASS | GALILEO | NavIC | SBAS | |||||||||||||
|---|---|---|---|---|---|---|---|---|---|---|---|---|---|---|---|---|---|---|---|
| L1CA | L1C | L2C | L5 | L6 | B1I | B1C | B2I | B2b | B2a | B3I | G1 | G2 | E1 | E5a | E5b | E6 | L5 | L1 | |
| A | • | (1) | - | • | - | • | • | - | - | • | - | • | - | • | • | - | - | (1) | • |
| B | • | (1) | • | - | - | • | • | • | - | - | - | • | • | • | - | • | - | - | • |
[1] Supported upon request with special firmware
Switching from Option A to Option B requires re-flashing a different firmware version.
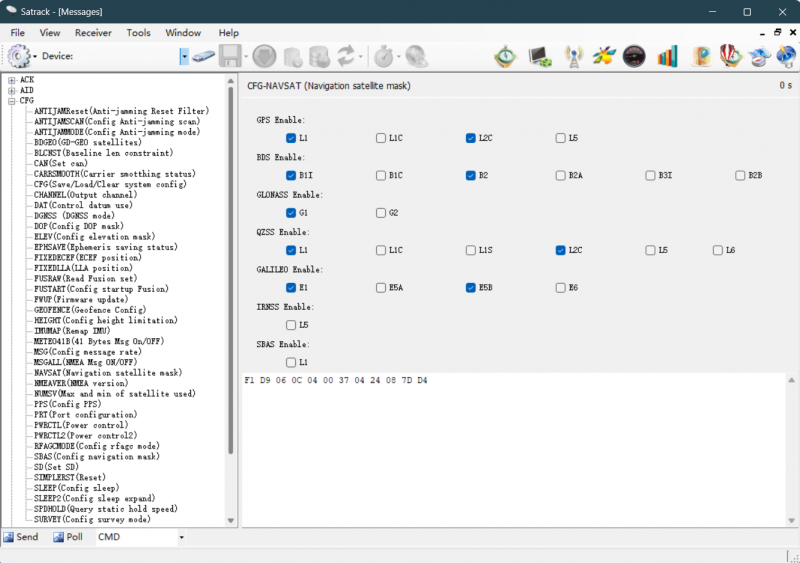
1. Open the Satrack software, after connecting the device, under the AS Message window, in the CFG-NAVSAT section,
2. first poll the current configuration, then you can turn off certain bands, such as turning off G1, and then send.
3. If you need to maintain the status for the next time, you should save it with CFG-SAVE.
Q: How to save data for debug?
A:

