Difference between revisions of "Quickguide"
| Line 32: | Line 32: | ||
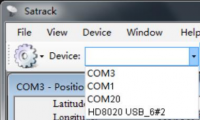
[[File:satrack-choose-comport.png|200px| | [[File:satrack-choose-comport.png|200px|thumb]] | ||
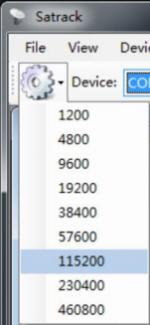
[[File:satrack-baud-rate.png|150px| | [[File:satrack-baud-rate.png|150px|thumb]] | ||
Revision as of 16:37, 7 September 2023
Satrack - GNSS Evaluation Software
Please download satrack from Satrack Download Link .
System requirements
Satrack is built on top of Microsoft .NET Framework 4.0. Please make sure it is installed on the user’s PC. It can be downloaded from Microsoft: https://download.microsoft.com/download/2/0/e/20e90413-712f-438c-988e-fdaa79a8ac3d/dotnetfx40.exe
Some features of Satrack require the support from Google Earth. In order to let Satrack reach its best performance, it is highly recommended to install Google Earth on the user’s PC.
It can be downloaded from https://earth.google.com
Connect an evaluation kit to the PC
This section assumes that you have an ALLYSTAR evaluation kit. The evaluation kit can be connected to the PC by using either an USB or a serial cable. In case of using the USB port, a driver is required (please contact our technical support to get the USB driver if necessary). Be sure to install the driver before connecting the evaluation kit to the PC.
- Connect one end of the USB cable to the USB connector on the evaluation kit.
- Connect the other end of the USB cable to your PC. The USB cable now supplies power to the unit.
- Connect the GNSS antenna to the interface unit. For the best GNSS reception, place the antenna outside or near a window.
Choose com-port and baud-rate
To connect Satrack with a GNSS receiver through a COM port or USB port on PC, follow these steps: From the main menu, check the Device combo box, and then choose the desired port.
DOWNLOAD
Satrack Download Link


